Key Takeways:
Calibrating retraction may seem like a serious task, but with a little humor and some helpful tips, it can be a laugh-out-loud experience using this retraction 101 guide!
Here are some humorous and wise words for successful retraction calibration:
- Don’t be afraid to retract – Retraction calibration is all about getting the correct distance of filament to retract from the nozzle to reduce filament leakage.
- Take baby steps – Just like in a relationship, slowly and surely win the race. Start with small amounts of retraction and work your way up.
- Laugh – If you encounter problems, don’t get upset. Laugh, take a break and come back to the topic with a fresh perspective.
- In conclusion, calibrating retraction can seem like a daunting task, but with a relaxed approach and a little patience, it can be a fun-filled adventure! Successful prints!
What is retraction and why is it important in 3D printing?
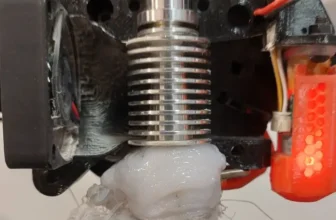
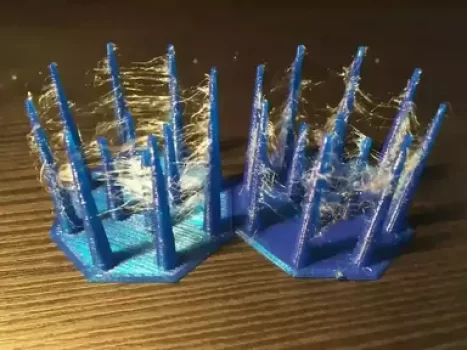
FDM 3D printing involves melting plastic filament and extruding it precisely layer by layer to create a 3D object. The melted plastic tends to continue to leak from the nozzle even when it is not being actively pushed by the extruder. To prevent this, our slicing software uses retraction, which involves pulling the filament back from the hot end, reducing pressure and limiting leakage. When set up properly, this technique helps eliminate stringing, the unsightly flow of plastic between two points of a model.
Below is a photo showing fine, spider web-like stringing.

Retraction-related parameters
1. Retraction distance:
This setting determines how far the filament is retracted when necessary. A small distance may not solve the problem, while an excessive value will result in a lack of plastic during the next extrusion.
To avoid this, the priming setting can be used. This returns the filament to its original position before retraction.
It is important to set the minimum retraction distance to reduce the stringing. A range of 3-6 mm usually works for Bowden type extruder printers, but it is recommended to start with 3 mm and adjust as needed.
Retraction Speed
This speed determines how fast the extruder rotates backwards and the filament is withdrawn from the nozzle expressed in mm/sec. A value of 20 mm/sec is a good starting point and can be adjusted by retraction tests.
Prime speed
This value determines the speed at which the material is returned to the nozzle. The retraction speed is divided into two different parameters to control the pressure on the extruder gear.
Extra restart distance
The retraction distance will be reversed when the retraction movement ends. This is usually zero, but you can choose to have extra filament extruded (a positive value) or less than has been retracted (a negative value). It is also measured in mm.
Z hop
The value in mm of the vertical height of the nozzle during a displacement movement (without extrusion). After this movement, the correct Z-value is then restored before the filament is re-inserted ready for printing.
Retraction calibration tests
Temperature tower: Impact of hotend temperature on printing
Hotend temperature, a critical printing parameter, significantly affects the stringing effect. As the hotend temperature increases, the filament becomes more fluid, which leads to more leakage from the nozzle. To get the best results, it is essential to calibrate the hotend temperature. The recommended way to do this is by printing a temperature test, which gradually increases by 5ºC at predefined intervals.

By clicking on “Thing details”, you will find a multitude of G-code files that are already optimised for different filaments. If you use SuperSlicer, OrcaSlicer or Bambu Studio in the “Calibration” tab you will find the “Filament Temperature Calibration” option which will guide you how to generate a G-code file for your printer. PrusaSlicer and Cura do not yet have such an option implemented but it can be generated using several processes. If you don’t want to use any slicer, the easiest solution is to use the files from the recommended temperature tower.
Source: Thinghiverse
Basic stringing test
Once you have calibrated the temperature of the filament you are going to use, the next step is to calibrate the retraction, in particular the parameters explained above. For this if you use SuperSlicer, in the same tab “Calibration” you find the option “Extruder Retraction Calibration”, if you use other programs you can use the generator developed by TeachingTech that you can find here, with detailed explanations. For calibrating the printers I have used so far I have used this generator because it gives you the possibility to calibrate parameters in more detail.
Frequently asked questions
Is the retraction the same for Bowden and Direct Drive extrusion systems?
Although retraction activation is useful regardless of the type of printer, Bowden machines usually require a greater retraction distance compared to direct drive printers.
The reason is this: 3D printers using the Bowden system (such as the Ender 3) place the extruder away from the hotend, and the filament is channeled through a PTFE tube. Since the tube has an internal diameter of 2 mm and the filament has a diameter of 1.75 mm, the difference between them leaves room for filament compression when it is retracted. Direct drive systems do not have this problem, and filament retraction tends not to be such a problem. Essentially, Bowden systems require a much greater retraction distance.
Is the retraction the same for all filament types?
Fortunately, PLA is a very stable polymer, so it’s possible to tune our printer to achieve almost zero stringing. The same goes for ABS, although it presents other problems such as warping and cracking. Other materials, such as PETG, require a much higher temperature to melt, which encourages stringing as it cools.
Flexible materials, such as TPU, compress during extrusion and stretch during retraction, so it is not very convenient to activate retraction to print it. In this case, stringing is inevitable.
In addition to retraction settings, moisture in the filament can also increase the likelihood of stringing, which is why I always recommend storing your filaments in an airtight container with plenty of silica gel bags that can absorb moisture.